Thursday, May 31, 2007

Turtle Cheesecake


  • 1 package of oreos ground down into crumbs (use either a food processor or blender)
  • 6 Tbsp. butter or margarine, melted
  • 1 squeeze bottle of Hershey's caramel sundae ice cream topping (Do NOT use SMUCKERS! It hardens in the oven and makes your crust so hard you can't even eat it OR 1 bag of kraft individually wrapped caramels + 2 tbsp of milk or evaporated milk
  • 1 bag of chopped pecans
  • 3 pkg. (8 oz. each) Cream Cheese or neuchatel cheese, softened
  • 1 cup sugar
  • 1 Tbsp. vanilla
  • 3 eggs
  • 1/2 bag of milk chocolate morsels
  • Parchment paper, Nonstick Spray, Aluminum Foil

(Use a 9'' nonstick spring-form pan with the outside covered in tinfoil and the inside lined with parchment paper and lightly sprayed with nonstick spray)

  1. Preheat oven to 300.
  2. Mix crumbs and butter; press firmly onto bottom and 2 inches up side of pan.
  3. Pour half of the caramel and pecans into the crust. Refrigerate 10 minutes.
  4. Remove your cream cheese block from the foil and microwave for about 30 seconds up to 1 minute (cream cheese can cook and brown just like motzarella cheese on a pizza - so be careful and don't over do it on the time in the microwave! -- The whole point of microwaving it is just getting it warm - not hot - so you will have a smooth cheesecake, free of lumps).
  5. Place into mixer and mix until creamy. Add sugar in slowly. When sugar is completely incorporated, add in the vanilla, 1 tsp at a time. Add eggs, 1 at a time, mixing on low speed after each addition just until blended. Do NOT overmix your cheesecake! It will make it rise and fall like a souffle and then leave the possibility wide-open for your cheesecake to crack during the cooking process (which can also happen if the cheesecake is cooled too quickly).
  6. Pour over caramel layer in crust. Bake 1 hour 5 minutes to 1 hour 10 minutes or until center is almost set. Cool on the counter for at least one hour, preferably two. If you cover your cheesecake and refrigerate it while still warm, condensation will gather on the underside of the cover and drip onto the cake, making the first layer slimey and discolored -- so its important that you cool it slowly. By cooling too quickly -- not only do you have to worry about the slimey discoloration, but also the risk of having a cracked cheesecake and a huge trench to fill -- so dont skip this part......Trust me :)
  7. Run knife or metal spatula around side of pan to loosen cake. Chill completely for at least 4 hours (if not overnight) in the fridge before removing side of pan.
  8. After cooling, run the knife around the edges again. Unlatch the spring form around the circular bottom and gently lift it up the sides of the cake. Gently lift the cheesecake off of the spring form bottom and parchment using a large, thin spatula and transfer it to whatever you're going to serve it in. Do not top your cheesecake until its transferred to your serving platter or else you'll have a mess! If you're looking for something to serve this in, without having to use your spring form pan, I found some party platters that are perfect for Cheesecakes at Walmart. They have a thick aluminum bottom and a plastic top. Totally disposable! The only thing is -- wrap them in at least two layers of aluminum foil (the platter with the cheesecake inside) before transporting them anywhere. It will ensure your dessert will arrive safely and more intact!
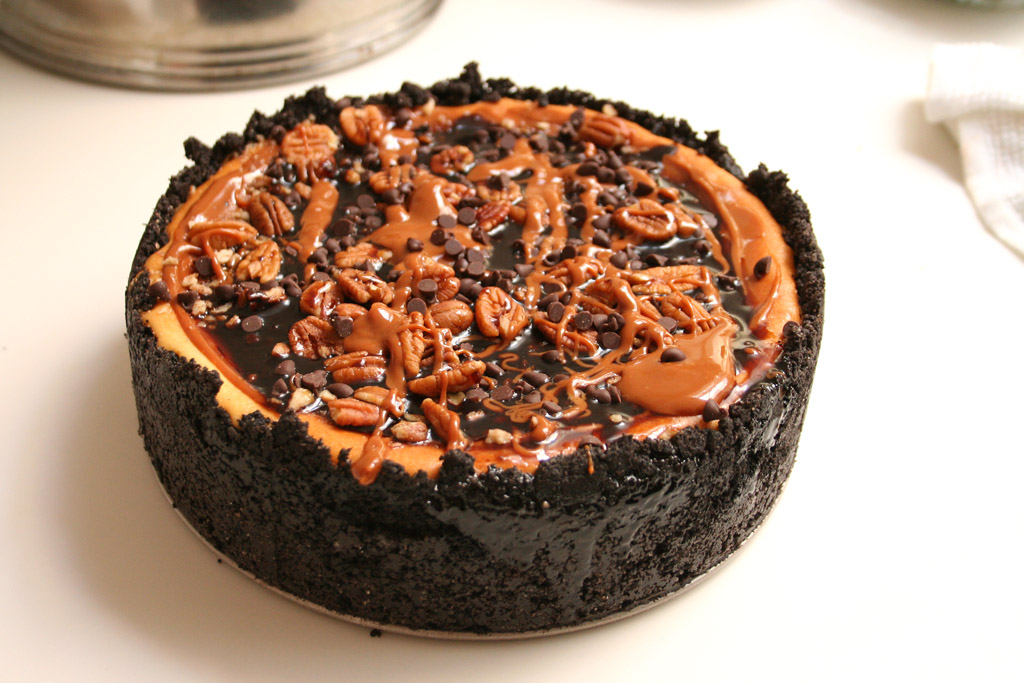
  9. Pour over the remaining caramel and pecans (reheat if using the kind you have to melt) Melt chocolate chips + 2 tbsp of milk in the microwave for 15-30 seconds until they are a consistency you can drizzle over the cake. Store leftover cheesecake in refrigerator.
  10. You may even top it with a few more chocolate chips! Its your cheesecake! Indulge how you wish!


This recipe is VERY forgiving and can be altered depending on your needs.

For example:


For a 10'' spring-form pan, you'll need:


1 package of oreos pureed to just crumbs
1 stick of butter


4 bars of cream cheese
4 eggs
1 & 1/3 cup sugar
1 tbsp + 1 tsp vanilla

(caramel & nuts don't change)

Bake an extra few minutes until the middle just barely jiggles.


For a 12'' spring-form pan, you'll need:

1 package of oreos pureed to just crumbs
1 stick of butter

5 bars of cream cheese
5 eggs
1 & 2/3 cup sugar
1 tbsp + 2 tsp vanilla
(caramel & nuts don't change)


Bake an extra few minutes until the middle just barely jiggles.


No spring-form pan ~ No problem!

Turn it into little individual cheesecakes with a muffin tin!
Cut your recipe to:

1 cup of oreo crumbs
3 tbsp butter
2 bars of cream cheese
2 eggs
2/3 cup of sugar
2 tsp vanilla

Press a spoonful of your cookie mixture into cupcake liners in a muffin tin and spoon over the cheesecake mixture and bake for 20 minutes.


Not in the mood for chocolate?? (Although *I* MYSELF could not imagine that. . .)

You can substitute the oreo and butter for plain graham cracker crumbs and butter and top the cheesecake with your choice of either fresh fruit or fruit topping or even PIE filling!


For the individual cheesecakes: You can substitute the cookie mixture and put in a Nilla wafer in place of the crust and top with fruit topping! (pictured above with blueberry pie filling).


You cannot go WRONG with this recipe!
Trust me!
Everything here is:

Jennifer Tested
Mother Approved

Mexican Lasagna

THIS IS A DOUBLE RECIPE AND MAY
BE HALFED FOR JUST ONE 9 X 13 PAN
OF MEXICAN LASAGNA
  • 3 tablespoons extra-virgin olive oil
  • 4 pounds ground turkey
  • 1 large can of refried beans
  • 1/4 cup of water
  • 1 tbsp olive oil
  • 1 packet of taco seasoning *powder* (mild or medium depending on your taste)
  • 1 sweet onion (chopped finely)
  • 1 large can of crushed tomatoes
  • 1 (8 oz) jar of taco sauce *liquid* (mild or medium depending on your taste)
  • 2 (15-ounce) cans black beans, drained and rinsed until water runs clear
  • 1 small bag of frozen corn
  • 1 bag of burrito sized flour tortillas
  • 4 (8 oz packages) shredded cheese (2 fiesta blend cheese & 2 mild cheddar)
  • 2 scallions, finely chopped
  • Sour cream
  1. Preheat the oven to 350
  2. Preheat a large skillet over medium high heat. Add 2 tablespoons extra-virgin olive oil – twice around the pan. Add turkey and onion. Brown the meat and onion mixture. (Drain if necessary)
  3. Add the crushed tomatoes, taco seasoning, taco sauce, black beans and corn. Heat the mixture through and simmer a couple of minutes.
  4. In a separate pan, take the large can of refried beans and add the olive oil and water. Mash them with a potato masher or something similar and stir until they are spreadable.
  5. Coat a 9 x 13 baking dishes with remaining extra-virgin olive oil.
  6. Cut the tortillas in quarters.
  7. Layer as follows: (From the bottom up) - Olive oil to coat the pan. . . Then: meat sauce, cheese, tortilla, beans, meat sauce, cheese, tortilla, beans, meat sauce, cheese, tortilla, cheese.
  8. Bake lasagna 12 to 15 minutes until cheese is brown and bubbly.
  9. Cook for 10 minutes and top with scallions and sour cream.

This is a Racheal Ray adaption. Her method - I of course adapted it to fit MY family's taste! So this is my recipe from her method! This is always a HUGE hit and makes great left overs!

You could omit the refried beans layer and use ground chicken and have HER recipe -- or you could also add olives, peppers, etc and make it your OWN~ but I prefer it just the way I usually make it!

Mexican Chicken Pasta


  • 3 cups bow tie pasta, uncooked
  • 4 boneless skinless chicken breast halves (1-1/4 lb.), cut into strips
  • 1/2 lb. (8 oz.) Velveeta cheese, cut up
  • 1 can cream of mushroom soup
  • 1 cup Thick 'N Chunky Salsa
  • 1/4 cup milk
  1. COOK pasta in large saucepan as directed on package; drain. Return to saucepan.
  2. SPRAY large skillet with cooking spray. Add chicken; cook and stir 4 to 5 minutes or until cooked through.
  3. ADD to pasta in saucepan along with the remaining ingredients; cook on low heat until VELVEETA is melted, stirring occasionally.

Hamburger Roll-up


1 lb. lean ground beef
1/2 cup chopped onions (about 1 small)
1/2 lb. (8 oz.) Velveeta cheese.
1 pkg. (13.8 oz.) refrigerated pizza crust
  1. Preheat oven to 350.
  2. Cook ground beef and onions in large skillet on medium-high heat until ground beef is evenly browned, stirring occasionally. Drain; return meat mixture to skillet.
  3. Add Velveeta in thin small chunks; cook until completely melted, stirring frequently. Cool 10 min. (It will turn almost into a paste consistency).
  4. Unroll pizza dough onto baking sheet sprayed with cooking spray. Press into 15x8-inch rectangle. Top evenly with meat mixture. Roll up dough, starting at one of the long sides. Rearrange, if necessary, so roll is seam-side down on baking sheet.
  5. BAKE 20 to 25 min. or until golden brown. Cut diagonally into six slices to serve.

Monday, May 28, 2007

Kitchen Tips: Cook's Essentials

Do you ever wonder what gizmo's and gadgets you REALLY need?!? I often do. . .

Here are the simple things that I feel every kitchen should have.
1. Bamboo Wooden Spoons (used in daily cooking for me)

It seems like that with every set of cookware, you're limited on what utensils you can use to cook with in them. I personally have a set of silicone, a set of plastic, a set of bamboo, and a set of stainless steel utensils. . . . Which do I use most everyday? -- The wooden. . . Here's why.

  • Stainless steel is preferred plastic or silicone (because stainless steel utensils will scratch the finish).
  • Cast Iron - Preferred Stainless Steel because silicone based utensils are sometimes too flimsy and plastic utensils will melt. (Some solid stainless steel utensils get hot and transfer heat to your hand).
  • Non-stick - Plastic utensils preferred so you don't scratch off the non-stick surface.
Silicone utensils have come a long way but to me are still a bit pricey and some pieces are definitely worth it. But my preference that is versatile for EVERY piece of cookware I have is wood ~ They are timeless and don't scratch unless you are intentionally trying to scratch something (but even with that - you better bring your elbow grease). . . They're stout, durable, very difficult to stain, will never melt, very slow to transfer heat to your hand, and are safe for ALL cookware!

When I really thought about it, wooden spoons are really the most ancient stirring method. Honestly, people have been stirring stuff with sticks for millenniums. Even when I was a young child, I use to play in the mud with a stick and "pretend" to stir something and cook. Its funny, but even as an adult, I still prefer wood over the new things coming out when it comes to everyday cooking.


2. The Spoonula (used in baking for me)

WILL CONTINUE POST LATER TODAY. ~ JNB

Sunday, May 27, 2007

Kitchen Tips: Stainless Steel

Before First Use ~

Wash in hot, soapy water then rinse and dry.

Cooking ~
  1. Preheat your pans unless you are putting on a pot of water to boil.

  2. Use about 1/4 less heat using Stainless than you would using non-stick or cast iron. Low to medium heat is generally the best for cooking.

  3. Use high heat only for boiling liquids.

  4. Medium to medium-high heat for sautéing & frying.

  5. Low heat for simmering or cooking eggs.

  6. Solid stainless steel pans/skillets (handles and all) are oven safe.


Since the pans are not non-stick, you have to add oil or butter to the pan or a combination of both to fry foods. Just be sure to put just enough to barely coat the bottom of the pan.

If your food is sticking here is the checklist from the MY manufacturer to check:

  • Is your stove level?

  • Is your pot clean?

  • Is your heat set too high? ~ Low to medium heat setting is recommended for optimal cooking performance.


Preventing Damage ~

DO NOT ADD SALT to anything in your pan until its either

(1) Boiling - Stirring well after its added.
(2) Fully preheated with the cooking process already started (frying/sauteing) already in progress.


Salt can damage the stainless and leave permanent white dots or pits on the inside. Although it does not damage the quality of the pan or its cooking abilities, its a permanent blemish for its cooking surface.


My personal set is an Emerilware 10 piece cooking set. I love it! I got it for Christmas last year and I adore it! Other than my cast iron, I will never cook with anything else. The picture below is my set. Mine has the stainless lids as pictured and the blended bottom (no copper stripe) like on some of his sets.


Keeping Them Beautiful ~

After use, I wash my pans immediately to prevent stuck on food tarnishing the surface of the interior of my pan set, and I also dry them completely to prevent water spots, to keep them looking great.

Its very important to cook on lower heat then you think you're going to need until you learn to cook on them.

My basic principle with the cooking temperature and getting it right is this:

Use the lowest heat possible to start with and then if its not hot enough after it gets going, you can raise the heat. Using lower heat then needed won't damage your pans. However, if you start off with too HIGH heat, its almost impossible to lower it down BEFORE damaging your pans. See my Preheating guide above. Any questions about it, please comment and leave your email address and I'll gladly get back to you!

(It is a learning process. You WILL make mistakes and its okay!)


Just Always Remember: Overheating can cause discoloration and spots on the interior of your cookware set. Food also, can discolor your pans if not immediately removed too (even though the discoloration may not show up until the next time you use that pot/pan). Also, depending on your area, iron in your water can cause your pots/pans to appear rusty.


Cleaning the Stainless Steel ~


Immerse in hot water. If using a stainless steel cleaner (Preferred: Bar Keeper's Friend ~ In your local grocery store in the cleaning isle ~ Its a powder) ~ Mix it with water to form a paste. Apply paste using a soft cloth or sponge. Run in a circular motion from the center outward. Wash in hot soapy water, dry immediately.

If you have a copper band on the bottom: Copper is a semi-precious metal and will tarnish with use. Any over-the-counter copper cleaner will restore it to its natural luster. DO NOT USE oven cleaners or cleansers with chlorine bleach. DO NOT USE steel wool, steel scouring pads or harsh detergents. Nylon scrubbing pads are safe to use.

You may wash Stainless in the dishwasher but you risk losing its luster and shine. I prefer to handwash them, but thats just MY preference. The choice of how to take care of your own set is yours.

Kitchen Tips: Cast Iron


Cast iron can be a natural non-stick surface if it is properly cared for and seasoned.

When you think of things being passed down from generation to generation and you are a cook or a foodie, the first thing that should pop into your head should be Cookware ~ Specifically, Cast Iron. . . Cookware that can last years. . . Even generations. . .

My mom has some of my father's grandmother's cast iron and its still in the condition that it probably was when she cooked with it, because we take the time to take care of it. She seasoned it, we just kept up the care for it.

For those of you who have been passed down cast iron and aren't really sure where to start or just simply don't know how to season it, re-season/re-condition, or are really not sure how to keep it that way, I'm going to tell you!


Your Cast Iron will NOT be non-stick until it goes through the seasoning process and some pans can even take 1-3 times before they're perfect for your preference.

New pans are dark grey. After the pan has been seasoned, it will be a coal black. This is perfectly normal and actually should be expected.


  • Heat the oven to 250 - 300

  • Coat the pan with lard (Crisco). DO NOT use liquid because it will be sticky and also I wouldn't use bacon grease the first time because it will smoke and stink up your house.

  • Put the pan in the oven.

  • In 15 minutes, remove the pan & pour out any excess grease.

  • Place the pan back in the oven and bake for 2 hours.


**This process can be done as often as needed or preferred**


  • If the pan was not seasoned properly or a portion of the seasoning is patchy and needs re-done or even if there is rust, it needs to be properly cleaned and re-seasoned.

  • Warm the pan slightly (until still safe to touch) and remove any food residue or rust by cleaning the pan thoroughly with hot water and a scouring pad. Heating it makes it easier to clean.

  • Dry the pan immediately with dish towel or paper towel.

  • Repeat the same seasoning steps listed above.


  • It's best to clean the cookware while it is still warm/hot by rinsing with hot water and scraping when necessary. If by chance its not still hot and there is food stuck use VERY the least amount of liquid detergent (soap) that you can. Most people will tell you NO SOAP, but a TINY bit is okay on a last-resort basis.

  • NEVER leave your pans in the skin full of water to "soak". If you have stuck on food, its better to get something and scrape it out and go from there.

  • Do not use a scouring pad or an S.O.S. pad that has built in soap as they will break down the pan's seasoning.

  • Dry immediately~ Moisture can build up and rust. (Should rust appear, the pan needs to be re-seasoned).

  • Never store anything in your cast iron (food will ruin the seasoning and the pan will ruin the food.

  • Do not store your cast iron with the lids on to prevent rust.

  • I oil my skillets after they are clean and wipe down the excess oil with a papertowel. It leaves them with a glossy shine and keeps them in great condition.

Tonia ~ You know this one was for you! Hope it helps! ~ Jen

Cheesecake Brownie Bars


  • 1 box of brownie mix
  • 1/2 cup applesauce
  • 3 egg whites, divided
  • 1/4 cup water
  • 1 pkg. (8 oz.) Neufchatel Cheese, (Same flavor, less fat - Made by Philadelphia) softened
  • 1/2 cup sugar
  • 1/4 cup flour
  1. PREHEAT oven to 350°F.
  2. Mix brownie mix, applesauce, 2 of the egg whites and water. Pour into 13x9-inch baking pan sprayed with cooking spray.
  3. MIX Neufchatel cheese, sugar, flour and remaining egg white until well blended. Spoon over brownie batter. Cut through batter with knife several times for marble effect.
  4. BAKE 28 to 30 min. or until wooden toothpick inserted in center comes out with fudgy crumbs attached. Cool in pan on wire rack.

*Chef's Tip*

Serve warm with Vanilla Bean ice cream OR ice cream AND fudge sauce, whip cream, and a cherry. This recipe gets a HUGE wow with very little effort!


Thanks to kraftfoods for this delicious recipe!


WOW FACTOR: HIGH

Saturday, May 26, 2007

Apple crisp


  • 4 apples, peeled, cored, and sliced (approximately 4 cups)
  • 1 tsp of cinnamon
  • 1/2 tsp of nutmeg
  • 1/2 cup of sugar
  • 1 cup light brown sugar
  • 1 cup instant oatmeal (plain)
  • 1 cup Flour
  • 1 stick of butter, softened


  1. Preheat the oven to 350 and spray a casserole dish with non-stick cooking spray.
  2. Mix the brown sugar, oatmeal, flour, and butter until you have a crumbly mixture. Pour 1/2 of the mixture into the bottom of the casserole dish.
  3. Lightly toss the apples in the cinnamon and sugar and pour over the crumbly mixture.
  4. Cover the remaining apples with the rest of the oatmeal topping.
  5. Bake 35-45 minutes or until golden brown.

**Tip**
If apples are out of season OR you just dont have any on hand, you CAN substitute the apple/cinnamon/sugar mixture with a can of Apple Pie Filling. (Some are pre-seasoned with cinnamon - depending on the brand ~ However, if they do not have any cinnamon, you can add 1 tsp of cinnamon & 1/2 tsp of nutmeg. There is NO need to add more sugar as the apples will come in their own sweet glaze).

Friday, May 25, 2007

Chocolate Brownie Ice Cream Cake


1/2 gallon of good chocolate ice cream (its worth the splurge to buy the good stuff)
1 box of brownie mix (prepared to box instructions)
1 bottle of Magic Shell chocolate ice cream topping
1/2 cup of chopped pecans

  1. Preheat oven to 350.
  2. Line the outside of a 10" x 2" springform pan with aluminum foil and spray the inside with nonstick cooking spray.
  3. Prepare brownie batter according to box.
  4. Pour into the spring form pan and bake. Take them out about 8-10 minutes early so they are still gooey.
  5. Top with half of the bottle of magic shell chocolate and 1/2 of the chopped pecans.
  6. Spoon in the softened chocolate ice cream and smooth down.
  7. Top with the remaining magic shell chocolate and the remainder of the pecans.
  8. Cover with tin foil and freeze until the ice cream is re-frozen 2-6 hours.


This is absolutely the BEST ice cream cake I personally have ever eaten. DQ ain't got nothin on this winner!

Black Forest Cheesecake

  • 20 OREOs crushed (about 2 cups)
  • 3 Tbsp. butter, melted
  • 4 pkg. (8 oz. each) Cream Cheese, softened
  • 1 cup sugar
  • 1 tsp. vanilla
  • 1 cup Sour Cream
  • 6 squares BAKER'S Semi-Sweet Baking Chocolate, melted
  • 4 eggs
  • 2 cups thawed Whipped Topping
  • 1 can (21 oz.) cherry pie filling
  1. PREHEAT oven to 325ºF.
  2. Line 13x9-inch baking pan with foil, with ends of foil extending over sides of pan.
  3. Mix cookie crumbs and butter; press firmly onto bottom of prepared pan. Bake 10 min.
  4. BEAT cream cheese, sugar and vanilla in large bowl with electric mixer on medium speed until well blended.
  5. Add sour cream and chocolate; mix well.
  6. Add eggs, one at a time, mixing on low speed after each addition just until blended.
  7. Pour over crust.
  8. BAKE 40 min. or until center is almost set. Cool.
  9. Refrigerate at least 4 hours or overnight.
  10. Lift cheesecake from pan, using foil handles.
  11. Top with whipped topping and pie filling.

Thanks to kraftfoods.com for this amazing recipe!

Coconut Cream Pie


  • 2 cups cold milk
  • 2 pkg. (4-serving size each) Sugar Free Vanilla Flavor Instant Pudding
  • 1 cup flaked coconut, divided
  • 2 cups thawed Sugar Free Whipped Topping, divided
  • 1 graham cracker crust (6 oz.)


  1. POUR milk into large bowl. Add dry pudding mixes and 3/4 cup of the coconut. Beat with wire whisk 2 minutes.
  2. Gently stir in 1 cup of the whipped topping.
  3. Pour into crust.
  4. Refrigerate 4 hours or until set.
  5. Top the pie with the rest of the whipped topping.
  6. Toast the rest of the coconut a sprinkle over pie.
  7. Store leftover pie in refrigerator.

**Yields one pie**

Wednesday, May 23, 2007

Homemade Chicken Alfredo


  • 1 (8 ounce) box of fettuccine
  • 1 package of non-breaded chicken tenders or boneless skinless breasts
  • 1 tbsp of olive oil (used only if cooking chicken in a skillet on the stove)
  • 1 stick of butter
  • 1/2 cup heavy cream
  • 1 + 1/2 cups grated/shredded Parmesan cheese.
  • 1 cup of motzerella cheese
  • 1 tub of cream cheese
  • 1/2 tsp of salt
  • 1/8 tsp ground black pepper (I would NOT use fresh cracked for this recipe)
  • Chopped fresh parsley for garnish (optional) - (Garnish with FRESH herbs ONLY. DO NOT garnish with dried. The flavor would be too overbearing to use dried parsley flakes)
  1. Cook fettuccine according to directions on the package.
  2. Brown chicken (cut into bite-sized pieces) in the olive oil OR grill them on an indoor grill (i.e. George Foreman grill). After they're done, let them rest for a few minutes before you slice them into bite-sized pieces to keep them juicy.
  3. While fettuccine is cooking, add in the heavy cream and butter into a sauce pan and stir until its hot and bubbly and the butter has completely melted. Add in the salt & pepper and the cheeses and stir until completely melted. This part may take a while - but be patient, its well worth the wait!
  4. Cook pasta until its tender and drain.
  5. Pour cooked pasta and chicken into a bowl and drizzle over it the white sauce and fold thoroughly until every tender morsel is coated in this YUMMY sauce!
  6. Garnish with parsley if you feel its completely necessary. Usually the only garnish I need is some extra parmesan cheese on top! Enjoy!

Okay okay..... I know this is an incredibly sinful recipe, so I put a less guilty version. Replace the five purple ingredients above with these five purple ingredients below. The method is the same.

1/3 cup margarine
1/2 cup evaporated fat-free milk
3/4 cup grated reduced-fat Parmesan cheese blend

3/4 cup of reduced fat motz. cheese
1 canister of fat free cream cheese


This is a very versatile recipe. Feel free to add peas or broccoli, substitute the chicken with shrimp or a mixture of both, and you can also switch up the type of pasta you use, from fettuccini to rotini, penne, or whatever you like!   

Kitchen Tips: Cheesy Pasta Dishes

Cheesy Pasta Dishes:

Spray the underside of the aluminum foil that will be covering a dish topped with cheese with non-stick cooking spray. It helps to prevent all the cheese from peeling off the top of the dish and sticking to the tin foil after its done baking.

Also, when covering a pan of tomato-based pasta with aluminum foil, make sure it doesn't lay directly on top of it ~ Tent it a tad bit.

Cavatini


  • 1 lb of ground hamburger meat (browned and drained well)
  • 3 mild italian sausage links (either browned in the casing and sliced OR squeezed out of the casing and browned with the hamburger)
  • 1 pound of pasta (rigatoni, elbow macaroni, penne, or shells) (cooked al dente - still a little firm)
  • 1 jar of your favorite spaghetti sauce
  • 1 (32 oz) can of tomato sauce (puree)
  • 1 onion (chopped to your preference)
  • 1 tsp of italian seasoning (oregano & thyme combination) OR 1 tsp of oregano
  • 1 tsp basil
  • 1 tsp of garlic powder
  • 4 good four-finger pinches of sugar (using thumb and first three fingers ~ it helps to cut the acidity in the tomato puree)
  • 1 small can of mushrooms (drained)
  • 2 (8 oz) bags of shredded cheese (1 italian blend & 1 mozzarella)
  • 1 tbsp of olive oil
  1. Preheat the oven to 350.
  2. Put on a pot of water to boil and put a lid on it (Water boils faster when it has a lid on it)
  3. While waiting for the pasta water to boil - In a large skillet, brown the italian sausage and hamburger together with the onion at medium to high heat. Usually about the same time the meat gets brown, the water is usually boiling.
  4. When the pot of water comes to a boil add a pinch of salt but no oil. (Adding oil to pasta while its cooking causes the pasta itself to also becoming oily and prevents sauce from sticking to the pasta) - Boil the pasta until JUST BEFORE its done and the pasta is still firm (al dente).
  5. Lower the heat. Add in the spaghetti sauce, tomato sauce, herbs (spices), sugar, and mushrooms. Let them simmer until the pasta is al dente.
  6. When the pasta gets done, ladle out 1/2 cup of pasta water into the sauce, and then drain it well.
  7. Dump pasta into a big mixing bowl. Fold in the sauce/meat mixture.
  8. Fold in 1/2 of each bag of cheese.
  9. Grease 9 x 13 pan using 1 tbsp of olive oil and spread around with a paper towel.
  10. Pour pasta mixture into the pan and top with the remaining cheese.
  11. Cover with aluminum foil and cook for 25-30 minutes.


*KITCHEN TIP*

Spray the underside of the aluminum foil that will be covering the dish with non-stick cooking spray. It helps to prevent all the cheese from peeling off the top of the dish and stuck to the tin foil after its done baking.

Also, when covering a pan of tomato-based pasta with aluminum foil, make sure it doesn't lay directly on top of it ~ Tent it a tad bit.

Pot Roast

  • 4-5 lb roast (Options are shoulder, rump, chuck, or bottom round)
  • Salt and pepper to taste
  • Steak seasoning (the dry spice; Just shake on to taste ~ optional)
  • 6 cloves of garlic or 3/4 tsp of garlic powder
  • 1 onion (chopped to your preference) OR a half a bag of pearl onions
  • 1 cup frozen peas (optional) (They do sell a small bag of peas and pearl onions combined that is perfect for this)
  • 2 carrots (peeled and chopped to bite-sized pieces)
  • 2 stalks of celery (washed and chopped to bite-sized pieces ~ optional)
  • 6 red new potatoes (cut into quarters) OR 4 russet potatoes (peeled and chopped to bite-sized pieces) OR 2 large baking potatoes (peeled and chopped to bite-sized pieces)
  • 1-2 cup of water or beef broth
  1. Add in the water and spices and mix it together BEFORE you add in the meat and veggies. (You want to season the liquid that will steam everything else and infuse the flavor throughout the whole dish as you cook it).
  2. Dump everything else into the crockpot.
  3. Cook on HIGH setting and let it cook at least 6 hours OR on LOW setting overnight (at least 8-10 hours).

Crockpot Chili


  • 1-2 pounds of ground hamburger (May be substituted for chicken or turkey or completely omitted or even a meat substitute for vegetarian version)

  • 1 lb of cooked pinto beans (Leftovers are PERFECT for this recipe)

  • 1 can of tomato paste

  • 1 onion (chopped to your preference)

  • 1 bell pepper (chopped to your preference) *optional*

  • 1 (15 oz) can of tomato sauce

  • 1 tbsp of Chili Powder

  • 1 tbsp of Cumen

  • 1 (15 oz) can of stewed tomatos (celery, onion, and pepper flavored is preferred)

  • 2 packets of chili seasoning


  1. Brown the ground meat and drain. Sit aside.

  2. Add into cold crockpot, all canned ingredients.

  3. Stir in the seasoning and spices.

  4. Fold in browned hamburger meat and add to crock pot.

  5. Cook on LOW setting overnight stirring before you go to bed and when you wake up in the morning. Keep warm until ready to serve.

  6. Serve with a dollop of sour cream and green onions if you want.

Always remember - you can more spice in but cannot take it out if you put in too much. You can cut the acidity from the acid in the tomatos with a spoonful of sugar or two and can cut the heat in the chili and spices with a dollop of sour cream stirred in and/or some shredded cheese.

BBQ Chicken


  • 1 package of boneless/skinless chicken breasts
  • Salt & Pepper to taste
  • 1 bottle of "Honey" flavored BBQ sauce
  • 1/2 of a sweet onion (chopped to your preference)
  1. Salt and pepper raw chicken to taste.
  2. Place into crockpot with onions and BBQ sauce.
  3. Put on the lid and cook on HIGH setting 1-2 hours and then turn down on LOW setting until ready to eat.

**PLEASE NOTE**

White meat cooks quicker than dark meat.

Boneless meat cooks quicker than bone-in meat.

The same with pork ~ Bone-in takes takes longer to cook than boneless.

White meat: Wings & Breasts

Dark meat: Legs & Thighs

For example: A bone-in thigh would take longer to cook than a bone-in breast even though its smaller.

If you choose to use dark meat instead of white meat, or bone-in instead of boneless, you'll need to cook your chicken on HIGH setting longer than 1-2 hours. Instead, your cooking time will need to be 2-3 hours on HIGH or 5-6 hours on LOW setting.


Here is the general rule for crockpots as far as the age-old question:

To preheat or NOT to preheat?


You put COLD food into a COLD crockpot.
You put HOT food into a HOT crockpot.

BBQ Pork Chops


  • 1 package of boneless pork chops
  • Salt and pepper to taste
  • 1 bottle of "Original" flavor BBQ sauce
  • 1/2 of a sweet onion (chopped to your preference)
  1. Salt and pepper raw porkchops to taste.
  2. Place into crockpot with onions and BBQ sauce.
  3. Put on the lid and cook on HIGH setting 1-2 hours and then turn down on LOW setting until ready to eat.

Here is the general rule for crockpots as far as the age-old question:

To preheat or NOT to preheat?


You put COLD food into a COLD crockpot.

You put HOT food into a HOT crockpot.

BBQ Pulled Pork

  • 1 Pork Roast
  • 1 bottle of "Hickory" flavored BBQ sauce.
  • Crockpot
  1. Simmer on Low 3-4 hours.
  2. Shred with a fork and serve either on a bun as a pulled pork sandwich. Also great on a baked potato with butter, sour cream, cheese, and chives.

Here is the general rule for crockpots as far as the age-old question:

To preheat or NOT to preheat?

You put COLD food into a COLD crockpot.

You put HOT food into a HOT crockpot.

Banana Nut Bread


  • 1/2 cup of butter (1 stick)
  • 1 cup of sugar
  • 2 eggs
  • pinch of salt (about 1/8 tsp)
  • 1 tsp of baking powder
  • 2 cups of self-rising flour
  • 3 large ripe bananas (mashed up)
  • 1 dollop of sour cream (about 1 tbsp)
  • 1/2 cup of pecans or walnuts
  • 1 tsp of vanilla
  • 1/2 tsp of almond extract (optional)
  1. Preheat oven to 350. Pregrease your pans with butter. Either 4 mini loaf pans or muffin tins.
  2. Mix your wet ingredients first - eggs, butter, sugar, sour cream, and flavoring extracts (sugar is considered a "wet" ingredient because it absorbs and melts into the wet ingredients).
  3. Mix in your dry ingredients (baking powder, salt, and flour).
  4. Fold in the bananas and walnuts or pecans.
  5. Pour batter into mini loaf pans/muffin tins to the same levels so they all bake evenly.
  6. Bake mini loaf pans for 15-20 minutes (until they barely start to pull away from the sides of the pan) OR bake muffins for 12-14 minutes.

This batch is easily doubled when you have a bigger crowd for breakfast!

Tuesday, May 22, 2007

Double Layer Pumpkin Pie

  • 4 oz cream cheese (1/2 of a block)
  • 1 tbsp of milk
  • 1 tbsp of sugar
  • 1 tub of thawed sugar free whipped topping
  • 1 graham cracker crust
  • 1 cup of milk
  • 1 (15 oz) can of pumpkin
  • 2 packages (4 servings each) of Sugar Free Instant Vanilla Pudding
  • 1 tsp ground cinnamon
  • 1/2 tsp ground ginger
  • 1/4 tsp ground cloves
  1. Mix cream cheese, 1 tbsp of milk, and sugar together with 1/2 of the tub of whipped topping. Mix until completely smooth and add to your graham cracker crust as your first layer.
  2. Mix together the pumpkin, vanilla pudding, cinnamon, ginger, cloves, and remaining cup of milk together. Mix until smooth and make this mixture your second layer to the pie.
  3. Refrigerate for 4 hours or until set.
  4. Top with remaining cool whip as a garnish when served.

**yields one pie**

Thanks to kraftfoods for the GREAT recipe!

Gorilla Bread

  • 1/2 cup sugar
  • 1 tbsp cinnamon
  • 1/2 cup butter (1 stick)
  • 1 cup packed brown sugar
  • 1 (8 oz) package of softened cream cheese
  • 2 (12 oz) canned biscuits (10 count) *at room temperature*
  • 1 + 1/2 cups coarsely chopped nuts (walnuts preferred)
  1. Preheat oven to 350.
  2. Spray bundt pan with non-stick cooking spray.
  3. Melt butter and brown sugar over low heat to form a syrup.
  4. Flatten out biscuits and sprinkle with cinnamon and sugar.
  5. Divide your cream cheese block into 20 cubes and insert one cube into each biscuit and roll/seal with the cream cheese and cinnamon/sugar inside.
  6. Layer 1/2 walnuts, 10 biscuit bundles, and 1/2 of cinnamon/sugar mixture, and 1/2 syrup in bundt pan and then repeat - giving the desert TWO layers!
  7. Bake for 50 minutes.

Thanks to Paula Deen for this GREAT recipe!

Carrot Cake


*DIABETIC FRIENDLY: This is a sugar-free recipe that
sweetens with very little dark brown sugar and fruit*

  • 2 large egg whites at room temperature
  • 1/2 cup (114 g) plain nonfat yogurt
  • 3 tablespoons (45 ml) canola oil
  • 1/2 cup (136 g) unsweetened applesauce
  • 1/3-1/2 cup (73 g) dark brown sugar, packed
  • 2 + 1/4 teaspoons (10 ml) vanilla extract
  • 2 1/2 cups (313 g) unbleached all-purpose flour
  • 2 teaspoons (10 ml) baking powder
  • 1/2 teaspoon (5 ml) baking soda
  • 1/4 teaspoon (2.5 ml) salt
  • 2 & 1/4 teaspoon (5 ml) ground cinnamon
  • 1/2 teaspoon (2.5 ml) ground nutmeg
  • 1 cup (110 g) shredded carrots
  • 1/2 c unsweetened crushed pineapple with juice
  • PLUS 2 TBSP of pineapple juice.
  • 1/3 cup baking raisins
  • 1/3 cup of chopped pecans
  • 1/3 cup of chopped dates

1. Preheat the oven to 350°F. Lightly coat your pan with the baker's joy cooking spray. Baker's Joy Cooking Spray already has the flour built in and omits a step!

2. In a large bowl, whisk together the egg whites, yogurt, oil, applesauce, brown sugar, and vanilla. On a piece of waxed paper, sift together the flour, baking powder, baking soda, salt (if using), cinnamon, and nutmeg. Gradually add to egg-applesauce mixture, stirring until incorporated.

3. Stir in the carrots, raisins, stir the pineapple (with juice), dates, pecans, and raisins into the cake batter.

4. Spoon the batter into the prepared pan, smoothing the top with the back of a spoon. Bake for 30-35 mins and check it. When the cake pulls away from the sides of the pan it gives a little to the touch, its done. (toothpick will also come out clean).

5. Cool in the pan on a rack for 10 minutes. dump onto a plate to cool. 6. Ice when COMPLETELY cooled -- icing recipe to follow. Per serving (cake only): 103 calories (20% calories from fat), 3 g protein, 2 g total fat (0.2 g saturated fat), 19 g carbohydrate, 1 g dietary fiber, 123 mg sodium


FROSTING: (Also Sugar-Free)

8 oz. nonfat cream cheese
1 (9 oz.) pkg. sugar-free vanilla pudding
1 (8 oz) tub of sugar-free cool whip
1 1/2 cup of milk

(** I add the coolwhip to get it to the thickness I want..... the less you put in, the thicker it is -- I would fold in between 1/2 & 3/4 of a tub - Also, You can do a double batch of this icing, but cut the coolwhip down to 1 & 1/2 tubs if you double it*


Diabetic exchanges: 1 1/2 carbohydrate (1 1/2 bread/starch)

Herbal Introduction

Lightly mashing or smashing herbs releases their oils and fills the air with fragrance.


They say herb gardens are very easy to grow, however, I myself have had very poor luck! But what can I say? I'm the cook not the gardener!


Moving on!


Lesson 1: Identifying Herbs


Sweet basil is enjoyed for its mild peppery flavor, with a hint of mint and clove. A staple in Italian, Mediterranean and Thai cooking, basil can also be used in flower gardens, as border plants and in hanging baskets.


Cilantro (also called coriander) is a leafy herb with a sharp, aromatic flavor. It's popular in Latin American and Asian cuisines. *Ground corriander is cilantro seeds dried and ground into a powder and used for cooking*


Dill, often associated with pickling cucumbers, is delicious with salmon or potatoes.


Thyme grows up to a foot tall and spreads wider. It has a distinctive, spicy scent and can be used as a salad garnish or to flavor cooked vegetables. Some people believe that putting a sprig of it underneath your pillow helps you fall asleep more quickly.


Lemon thyme is a branchy trailing plant that forms mats of aromatic, lemon-scented foliage.


Oregano is one of the several species of wild marjoram that can grow up to two feet tall. It's a great herb for seasoning tomato dishes and meats.


Sage is an attractive garden plant, and some varieties have variegated leaves. Sage is traditionally used in breads and dressings that accompany turkey and pork. Hardy in Zones 4-8.

Chives have a mild onion flavor that enhances salads, egg dishes, soups and vegetables. The clover-like purple flowers that bloom in spring are also edible and make a colorful addition to salads. Hardy in Zones 3-9.


Lemon balm has a strong, heady citrus scent.

Mints are a family of plants known for their aromatic oils. A few leaves adds refreshing zest to a glass of lemonade or iced tea adds.

Spearmint is a tough perennial that thrives almost anywhere in the U.S. The bright green leaves are attractive in a flower arrangement, and this mint, too, is good for flavoring beverages.

Lavender is well known for its aroma. It grows into a bush with purple flower spikes that attract bees and butterflies. The dried flowers make lovely sachets for closets and drawers.

Rosemary, another member of the mint family, is one of the oldest herbs known to humankind. Through the ages it has been credited with healing wounds, alleviating headaches and improving memory. It is a strong, pungent herb, and a few leaves add a distinctive flavor to breads, poultry and vegetables. It becomes bushy and shrub-like in a few years. (Its wonderful on red potatoes sauteed with onion and a little bit of garlic).


Parsley is biennial, which means that it grows for two seasons and then dies and needs to be replaced. It is often used as a garnish and makes a nice addition to soups.